Almost every older home we work on in the east end has a version of the same basement: low and cool and a little damp, with the headroom changing as you cross the room. The number on the tape measure is rarely the real problem. It’s the low-hanging ductwork, the old piping and wiring threaded through the joists, the beams and posts standing exactly where you’d want a room to be, and the crawl space off in one corner that doesn’t connect to the rest of the basement — that’s what makes these spaces so hard to turn into something finished. And almost every owner asks us the same question anyway: can we get a real room down here? A legal apartment, even?
The honest answer is “maybe,” and it usually comes down to a number most people have never heard, and a decision the basement-lowering ads never actually explain. There are really four moves on the table, from cheapest to most involved: re-pour the old floor flat to claw back an inch or two, bench-foot, underpin, or leave the floor alone and solve your space some other way. Most of the companies advertising “basement lowering in Toronto” only sell one of those — usually the biggest one — so that’s the one they recommend. We do the whole project — the design, the permit, the structure, the finish — so we have no reason to push you toward a method you don’t need. Here’s how we actually think it through.
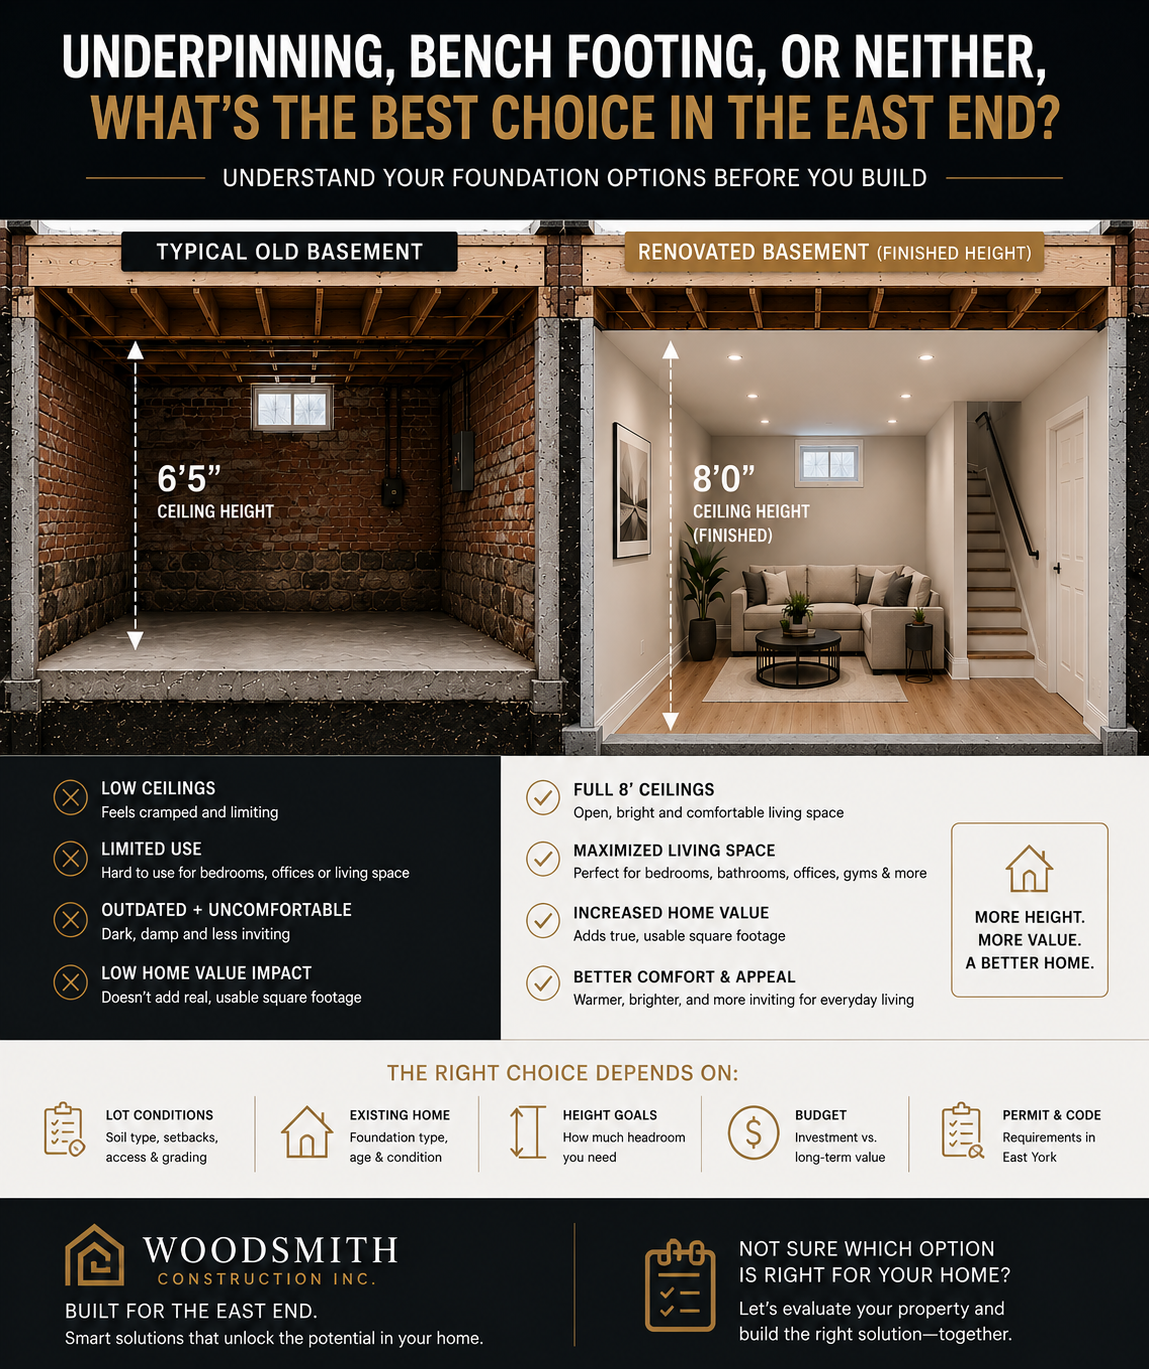
Start With the One Number That Decides Everything: Your Ceiling Height
Before anyone talks about excavation or concrete, measure your basement floor-to-joist height. That number decides almost everything — and which code number you’re measured against depends on the age of your house and what you’re building. The Ontario Building Code actually carries two different basement ceiling-height rules, and they get mixed up constantly:
- The standard rule — OBC Table 9.5.3.1. For basement space generally, the Code wants 2.1 metres (about 6’11”) over at least 75% of the area, and no less than 1.95 m (6’4¾”) under beams and ducts. This is the bar for new construction.
- The relaxation for a second unit in an existing house — OBC Part 11, Table 11.5.1.1.C., Compliance Alternative 102. If your house is more than five years old and you’re adding a legal second unit, a basement unit is permitted at 1.95 m (6’4¾”, roughly 6’5″) over the entire required floor area, including the route to the exit.
For the older East-Toronto homes we work on, it’s almost always that second number — 1.95 m / 6’4¾” — that governs, because the house qualifies as “existing” and the Part 11 compliance alternatives apply. That’s genuinely good news: it’s a more forgiving bar than the new-construction standard. (An attic suite gets its own rule — 2.03 m / 6’8″ over at least half the required area — but most suites go in the basement.)
So measure honestly, against the number that actually applies to you. If you already clear 6’4¾” across the unit, you may not need to lower the floor at all — the cheapest, happiest answer we get to give. If you’re sitting at 6’0″ or 6’2″, you’re short, and the conversation becomes how you get the height, not whether you need it. One trap worth flagging: a house less than five years old doesn’t get the relaxation and is held to the full new-construction standard — confirm your home’s status with your local building department before you bank on 6’5″. And if you only want a comfortable rec room rather than a legal suite, none of these suite minimums bind you at all — which is exactly why the first thing to pin down isn’t a contractor, it’s your actual goal. The goal sets the number, and the number sets the method.
The Cheapest Move First: A Flatter Slab Can Buy You Two Inches
Before we talk about going under the foundation, there’s a smaller move worth checking — and it’s the one nobody advertises, because there’s no money in it for a basement-lowering crew.
Most older east-end basements were poured with a thin slab that slopes toward a central floor drain. That slope, plus decades of patched-over high spots, means the headroom you actually live under is set by the highest point of the floor, not the average. Break out that old thin, sloped slab and pour a new, level one and you can often claw back an inch or two of clear height — sometimes just enough to clear a threshold you were barely missing. It won’t turn a six-foot cellar into a legal suite, and it won’t fix a foundation. But if you’re sitting an inch or two short of where you need to be, it’s a small fraction of the cost of underpinning, and it’s worth pricing first.
We raise it because it’s the honest opening question: can we get there by fixing the floor we already have, before we start excavating under the house? Often the answer is no, and you’re back to underpinning or benching — but it costs nothing to ask, and once in a while it saves a homeowner tens of thousands of dollars.
What Underpinning Actually Is — and Why Older East-Toronto Homes Make It Harder
Underpinning means going below your existing foundation — and the key thing to understand is that we never dig it all out at once. That would drop the house. We excavate in alternating sections, leaving solid ground between them so the wall stays supported the whole time, pour new concrete deeper than the original footing, and only move to the next section once the last has set. On a brick foundation we work in smaller bites — about four sections, no wider than three feet each. On a masonry or poured-concrete foundation we can take a little more — around three sections, up to four feet. Done in the right order, the whole foundation steps down and you gain full, flat headroom wall to wall, on a foundation that’s stronger than the one you started with. That’s why underpinning is the premium method.
The reason it demands that patience is the ground itself. The century semis and detached houses through Leslieville, Riverdale, Danforth Village and the Beaches sit on shallow, rubble or unreinforced brick foundations, and our soils don’t always cooperate — sandy ground that wants to cave the moment you open it up, and a water table that sits close to the surface, especially toward the Beaches. That water table sets a hard limit you can’t argue with: if water keeps seeping into the bottom of an excavation over about twelve hours, you’ve gone as deep as the house will let you. Push past it and you’re not building a basement, you’re committing the home to sump pumps running for the rest of its life. Knowing where that line sits — before you dig, not after — is the difference between a dry basement and a permanent problem.
Because of all that, the order of operations matters as much as the digging. We pour the underpins in their stages, then waterproof from the inside, then run the interior plumbing, and pour the new slab last — so the floor you finish on is sound, sealed, and sitting at exactly the height you planned for. It’s slow, deliberate work, and on a 110-year-old wall shared with the neighbour next door it’s where thirty years of east-end foundation experience earns its keep.
Bench Footing — the Cheaper Cousin, and Its Real Trade-Off
Bench footing (or “benching”) gets to a lower floor a different way — and a faster one. Instead of going under the existing foundation in sections, we leave the foundation wall where it is and dig the new basement out in one go, taking care not to disturb the angle of repose — the natural slope of soil that keeps the existing footing supported. Then we form and pour a continuous concrete “bench” that steps from the bottom of the old foundation down to the new, lower floor. It’s monolithic — formed as one — which makes it quicker and typically 30 to 40 percent cheaper than underpinning, with less risk and engineering involved.
But that bench is permanent, and it juts out from the wall into the room — so you lose a band of floor space around the entire perimeter. On a narrow east-end lot where the basement is only fifteen or sixteen feet wide to begin with, that lost band is real, usable square footage you don’t get back, and it dictates where a bed, a bathroom, or an egress window can go. Benching also doesn’t strengthen your existing foundation — it leaves the old wall doing the same job it always did. And it should never be used where water infiltration is a real concern — water can wash the soil out from behind the bench and undermine the very thing holding your basement up. For a sound, dry foundation under a modest rec room, benching can be perfectly fine. For a weak or shifting brick foundation under a house you’re about to add a legal unit to — and especially in our smaller homes, where every foot of floor counts — it’s frequently the wrong economy.
How We Actually Decide: Is Lowering the Floor Worth It?
Here’s the part most people get backwards. The real question isn’t “how short is my basement?” — it’s “what’s the cheapest way to get the space I actually want?” Lowering and finishing a basement gains you an entire floor of usable space, and surprisingly often it works out cheaper than the alternatives — a rear addition, or a third storey — for the same square footage. When it pencils out that way, it’s usually the better project too. So we start with that comparison, not the tape measure. A few things shape it:
Aim for about eight feet, not just the legal minimum. The 6’4¾” code figure makes a basement legal; around eight feet of finished height makes it genuinely good space — the kind you’d actually want to live in or rent. That target, not the bare minimum, is what we design the depth around.
Underpinning fixes more than height. Because you’ve opened the floor and gone deep, it’s the natural moment to renew the mechanicals — drainage, plumbing, often electrical — and to waterproof the foundation properly. One dig quietly solves a list of problems that would otherwise nag the whole house for years, and that hidden value is a real part of why the math so often favours doing it.
Test the soil first — always. Before any of this is a plan, get the soil tested. It drives whether the project is feasible, which method is safe, and what it will cost. It’s the cheapest insurance you’ll buy on the whole job.
Your neighbour matters more than your basement’s width. The width of your basement isn’t the constraint people assume it is. The real one is how close you sit to the house next door — and to see why, it helps to know one term. The angle of repose is the steepest slope at which loose soil will sit without sliding (picture the cone a pile of dry sand makes on its own). Every foundation is held up by an invisible wedge of soil at that angle; dig into that wedge and the footing above it starts to move. When you underpin, you go deeper than the footings beside you — and on a tight lot, going down can reach into the wedge of soil supporting your neighbour’s foundation. On any side where that happens, the underpin becomes a structural underpin: a heavier, separately engineered design that holds your neighbour’s house up while you work. It changes the cost, and sometimes the answer to “is this worth it” — which is exactly why we check it early, before a shovel goes in the ground.
Once that comparison points to lowering the floor, the next honest question is what it costs.
What It Really Costs in 2026
We price every basement per project, because the foundation we find when we open the floor is the foundation we price — not the one in a brochure. The per-square-foot figures floating around online are usually more misleading than helpful, so here’s the honest version.
For a normal underpinning job on the average basement in our area, budget somewhere between $50,000 and $100,000 to lower and finish it properly. Where you land inside that range comes down to the size and depth of the dig and your soil conditions — a straightforward job on cooperative ground sits lower; a deeper job in difficult soil sits toward the top.
That range is for a sound foundation. If the existing foundation is structurally compromised — already showing cracking and significant movement in the walls or the floor joists — it will cost more, because that’s additional structural work on top of the underpinning itself, assessed and quoted on its own. It isn’t the common case, but it happens from time to time, and it’s exactly the kind of thing we’d far rather find at the assessment than halfway through the dig.
On top of the build, budget for the engineered drawings (a licensed Ontario professional engineer) and the City building permit. And don’t forget waterproofing — in our experience, opening up an old east-end basement almost always turns up water management worth solving while the floor is already out.
The Permit and Engineer Reality (Don't Skip This)
Underpinning and basement lowering are not “while we’re down there” jobs. In Toronto they require a building permit, and the structural drawings have to be sealed by a professional engineer licensed in Ontario. Because those drawings carry an engineer’s seal, the application includes an Assumption of Responsibility for Engineering Content form — the engineer formally taking responsibility for the structural design. And because underpinning almost always means digging below the neighbour’s footings, going deeper than 1.2 m of unsupported wall, or working in clay or silt soil, the Code also requires field review — committed through a Commitment to General Review form, which puts the engineer on the hook to inspect the work on site as it proceeds.
That engineer involvement isn’t a formality — it’s the spine of the job. Before the first stage can be inspected, the engineer provides a letter confirming the site is ready and safe to proceed. As the work goes, they carry out field reviews and file reports stage by stage, and City inspectors will not pass a stage without the engineer’s report in hand. If you take one thing from this section: on an underpinning project the engineer is as essential as the crew, and a quote that treats them as optional is a quote to walk away from. (City of Toronto — Residential Underpinning)
- A grouted (dry-packed) top — not just a keyway pour. When concrete is poured straight up to the underside of the old foundation, it can trap a pocket of air at the very top, leaving a hidden gap between the new underpin and the existing wall — so the foundation isn’t actually supported where it matters most, and no one can see it. A properly grouted or dry-packed top packs that gap solid and guarantees full contact between the new concrete and the old wall. Ask how the top of the underpin is finished.
- How the new work ties into the old. Rebar dowels bond the new underpin to the existing foundation. They’re prescribed on most jobs — though not all, and it depends on what you’re tying into: on a concrete or masonry foundation with decent footings you can dowel rebar in, while on an old brick foundation that bond isn’t always possible. Either way, ask how the new foundation is being connected to the old one. A good answer tells you the contractor is thinking about the finished structure, not just the hole.
Woodsmith Insight: Most of the failed basements I get called to look at aren’t underpins — they’re bench footings. Benching is the cheaper, more popular move, so it’s the one people cut corners on: not enough concrete, never properly engineered, and then pushed out of place by water washing the soil out from behind it. The worst version is the one I see most — someone benches the floor and then cuts the soil’s natural slope flush back to the old foundation to claw back a little more room. That quietly turns the bench into a retaining wall it was never designed to be, holding back earth it can’t actually hold. Benching has its place on a sound, dry foundation where you only want a bit more comfort. But in an East End home, with our water table and our small floor plates, if you want real, legal height the honest math usually lands in the same place: bite the bullet and underpin it properly the first time.
The Honest Bottom Line
After all the options, here’s where we actually land — because you deserve a straight answer, not a menu.
There are real cases where you shouldn’t lower the floor at all. If your basement already gives you the height you need, don’t pay to chase more — finish it and move on. If you’re only an inch or two short, price the flat slab re-pour first. And if what you really need is more living space for your own family rather than a rental, the better dollar is sometimes spent going up or out — a second-storey or rear addition can deliver more comfortable, better-lit square footage than chasing it underground. We’ll tell you honestly when you’re in one of those cases.
But if you’re after genuine, usable height in an older east-end home, here’s the part we won’t dress up: a properly underpinned basement is the better basement. We build bench footings — there’s a place for them on a sound, dry foundation where the goal is modest — but a bench is a compromise, and an underpin isn’t. Underpinning gives you the full, flat floor, the stronger foundation, the renewed mechanicals, and the real height that makes the space worth having — whether that’s a legal apartment or the lower unit of a multiplex conversion. For most of the homes we work on, when the decision is a real one, underpinning is the one worth making properly the first time. Spending serious money to lower a basement and ending up with a compromised version of the room you wanted is the single outcome we’d steer you away from.
If you’re weighing the full picture of what an older east-end home really costs to renovate — foundations, water, access, and all — our deeper look at the real cost of aging homes in East Toronto is the companion read to this one.
Talk It Through Before You Dig
Lowering a basement is one of the few renovation decisions where the wrong first move is genuinely expensive to undo. If you’re looking at an older home in the east end — East York, Leslieville, Riverdale, the Danforth, the Beaches, or out to Scarborough — and wondering whether you can get a real, legal space underneath it, we’re happy to come look at the foundation, test the soil, and tell you honestly which answer fits. Get in touch and we’ll walk your basement with you.
Frequently Asked Questions
It depends which rule applies. For a second unit in an existing house (one more than five years old) — which covers most older-home conversions — a basement unit is permitted at 1.95 m (about 6’4¾”) over the entire required floor area, including the route to the exit, under the Building Code’s renovation provisions (OBC Part 11, Table 11.5.1.1.C., Compliance Alternative 102). The general new-construction standard is higher: 2.1 m (about 6’11”) over at least 75% of a basement, reduced to 1.95 m under beams and ducts, under OBC Table 9.5.3.1. If your basement falls short of the figure that applies to you, you’ll need to gain height to make the unit legal — and you should always confirm the governing standard with your local building department.
Sometimes, a little. Many older Toronto basements have a thin slab that slopes toward a floor drain, so your real headroom is set by the floor’s high point. Breaking out that old slab and pouring a new, level one can recover roughly an inch or two of clear height for a small fraction of the cost of underpinning — occasionally enough to clear a height you were just missing. It won’t get a six-foot cellar to a legal 6’5″, and it doesn’t strengthen the foundation, but it’s worth pricing before you commit to lowering the floor.
Underpinning extends your existing foundation deeper, letting you lower the whole floor with full flat headroom and a stronger foundation — it’s the premium method. Bench footing leaves the foundation alone and builds a sloped concrete ledge around the perimeter while lowering the middle of the floor. Benching is cheaper but permanently gives up perimeter floor space and doesn’t strengthen the existing foundation.
For a normal underpinning job on the average basement in our area, budget somewhere between $50,000 and $100,000 to lower and finish it properly — where you land depends mainly on the size and depth of the dig and your soil conditions. That range is for a sound foundation: if the existing foundation is structurally compromised (cracking and significant movement in the walls or floor joists), it costs more, because that’s additional structural work on top, assessed and quoted on its own. Bench footing comes in lower than a full underpin. We price every basement per project, because the foundation we uncover is what we price — and per-square-foot quotes tend to mislead.
Yes. Underpinning requires a City of Toronto building permit and structural drawings sealed by a professional engineer licensed in Ontario. Because the drawings carry an engineer’s seal, the application includes an Assumption of Responsibility for Engineering Content form — and where field review is required (digging below a neighbour’s footings within the angle of repose, going more than 1.2 m of unsupported height, or clay or silt soil), a Commitment to General Review as well. The engineer field-reviews the work and files reports stage by stage, and City inspectors will not pass a stage without the engineer’s report.
For real, usable height, underpinning is usually the better answer — it gives you a full, flat floor, a stronger foundation, renewed mechanicals, and height worth living under, and it’s often cheaper than adding the same space with a rear addition or third storey. The cases where you shouldn’t are narrower: your basement already has the height you need, you’re only an inch or two short (price a flat slab re-pour first), or the space is genuinely better added upstairs or out. Bench footing has its place on a sound, dry foundation with a modest goal, but it’s a compromise next to a proper underpin.
For your own family’s living space, an addition (going up or out) often delivers more comfortable, better-lit square footage per dollar than lowering a basement in a tight old house. Underpinning makes the most sense when a basement unit is specifically the goal and the height and structure must be right.


